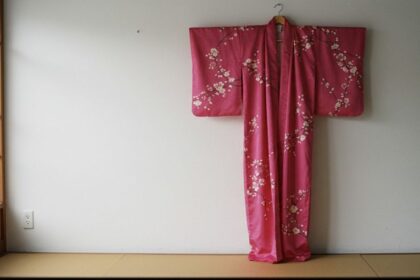
The kimono is more than a garment; it is a canvas of Japanese culture, artistry, and history. Each fold, stitch, and pattern tells a story, making it a piece of wearable art. To treat such an item with the respect it deserves, one cannot simply place it on a standard, narrow-shouldered Western hanger. Doing so can cause irreparable damage, stretching the delicate silk at the shoulders and distorting the garment’s precise, linear form. The traditional and correct way to hang a kimono for display or airing is on an ikou (衣桁 or 衣架), a special hanger designed to preserve its shape and showcase its full beauty. While antique ikou can be beautiful, crafting your own is a rewarding project that deepens your connection to the garment. This guide will walk you through the process of creating a simple, elegant, and functional wall-mounted kimono hanger, ensuring your treasured piece is displayed safely and beautifully.
1. Understanding the Ikou: More Than Just a Hanger
Before beginning the crafting process, it is essential to understand the design philosophy behind the traditional ikou. Unlike the contoured shape of a Western hanger, the ikou is fundamentally a long, straight bar. This design is intentional and serves several critical purposes. Firstly, it supports the kimono along its natural shoulder fold, distributing the weight evenly across the entire width of the garment. This prevents the stress points that cause stretching and tearing on conventional hangers. Secondly, the extended length allows the kimono to be displayed fully open, presenting the intricate artwork on the back and sleeves as it was meant to be seen.
There are two primary types of ikou: the freestanding frame, which often resembles a T-shaped structure or a small screen, and the simpler wall-mounted rod. This guide will focus on creating the wall-mounted version, as it is more accessible for DIY enthusiasts and suitable for most modern living spaces. The goal is to create a rod that is not only functional but also aesthetically complementary to the kimono it will hold.
2. Gathering Your Materials and Tools
The quality of your finished hanger will depend on the materials you choose. Wood is the traditional and recommended material due to its strength, beauty, and kindness to fabric. Below is a list of necessary materials and tools for this project.
Materials:
- Wooden Rod/Dowel: The centerpiece of your hanger. It should be at least 3-4 cm (1.25-1.5 inches) in diameter for strength.
- Hanging Cord: A strong, natural fiber cord.
- Wood Finish: To protect the wood and prevent snags.
- Wall Mounting Hardware: A sturdy hook or decorative bracket.
Tools:
- Measuring Tape
- Pencil
- Saw (a hand saw or miter saw will work)
- Drill with various bit sizes
- Sandpaper (in coarse, medium, and fine grits; e.g., 80, 150, 220)
- Clean cloths
- Spirit Level
To help you select the best wood for your project, consider the following comparison:
| Wood Type | Cost | Ease of Working | Aesthetic and Notes |
|---|---|---|---|
| Pine | Low | Very Easy | Lightweight and easy to sand and drill. Has a light color that can be easily stained. Prone to dents if not handled carefully. |
| Oak | Medium-High | Difficult | Very strong and durable with a beautiful, prominent grain. Harder to cut and drill, but creates a premium, long-lasting hanger. |
| Bamboo | Medium | Medium | A sustainable and strong option with a distinct, modern look. Can be prone to splitting if not drilled carefully. Very resistant to humidity changes. |
3. Step-by-Step Guide to Crafting the Hanger Rod
With your materials gathered, you can begin crafting the main rod. Precision and patience in these steps will result in a professional-quality finish.
Step 1: Measure and Cut the Rod A standard kimono has a width (from the center seam to the end of a sleeve, or yukitake) of around 65-70 cm, making the total sleeve-to-sleeve width approximately 130-140 cm. To ensure the sleeves do not bunch up, your hanger rod should be slightly wider. A length of 150 cm (approx. 59 inches) is an ideal target. Use your measuring tape and pencil to mark the desired length on your wooden dowel, ensuring your mark is straight and clear. Carefully cut the rod with your saw.
Step 2: Sanding and Smoothing This is arguably the most critical step for protecting your kimono. Any roughness or splinters on the wood can snag and pull the delicate threads of the silk or brocade.
- Begin with a coarse-grit sandpaper (e.g., 80-grit) to smooth out the cut ends and remove any major imperfections along the length of the rod.
- Move to a medium-grit sandpaper (e.g., 150-grit) to refine the surface.
- Finish with a fine-grit sandpaper (e.g., 220-grit or higher) for a perfectly smooth, silky feel. Run your hand along the entire rod; it should feel completely smooth to the touch.
Step 3: Drilling the Holes for the Hanging Cord Measure 5 cm (approx. 2 inches) in from each end of the rod and mark the spot on the top side. These holes are for threading the hanging cord. Using a drill bit that is slightly larger than the diameter of your cord, drill a clean hole straight through the rod at each marked point. Sand the inside edges of the holes lightly to remove any rough splinters.
Step 4: Finishing the Wood Applying a finish will protect the wood from moisture and give it a polished look. A natural oil finish is highly recommended as it soaks into the wood rather than forming a film on the surface, which could potentially interact with the kimono fabric over time.
- Apply a generous coat of Tung oil or boiled linseed oil with a clean cloth.
- Let it penetrate for 15-20 minutes, then wipe off all excess with another clean cloth.
- Allow it to dry completely according to the manufacturer’s instructions, which may take 24 hours or more. A second coat can be applied for deeper protection and sheen.
4. Assembling the Hanging Mechanism
Your choice of cord can add to the aesthetic of the hanger. Natural fibers complement the organic nature of the wood and the traditional kimono.
| Cord Material | Strength | Aesthetic | Cost |
|---|---|---|---|
| Jute Twine | Good | Rustic, natural, earthy look. | Low |
| Cotton Rope | Very Good | Soft, clean, and available in various colors. | Low-Medium |
| Silk Cord | Excellent | Luxurious and traditional. Can be found in decorative styles like kumihimo. | High |
Step 1: Prepare the Cord Cut two equal lengths of your chosen cord. The length will depend on how low you want the hanger to sit from its mounting point. A length of 50 cm (approx. 20 inches) for each piece is a good starting point.
Step 2: Thread and Secure the Cord Thread one end of a cord through a hole in the rod from top to bottom. Tie a secure stopper knot, such as a double overhand knot or a figure-eight knot, on the underside of the rod. Ensure the knot is large enough that it cannot be pulled back through the hole. Pull the cord taut to seat the knot firmly. Repeat this process on the other side with the second piece of cord. You should now have the rod with two cords extending upwards, ready for hanging.
5. Installation and Proper Hanging Technique
The final stage is to mount your creation and display your kimono.
Step 1: Choose a Location Select a wall space that is out of direct sunlight, as UV rays can fade the vibrant dyes of the kimono over time. Also, avoid areas of high traffic, heat sources, or excessive humidity.
Step 2: Mount the Hardware You can hang the two cords from a single, sturdy, decorative hook or from two separate hooks spaced a few inches apart for a different look. Use a stud finder to locate a wall stud for the most secure installation. If a stud is not available, use a heavy-duty drywall anchor designed to hold significant weight. Use a spirit level to ensure your hook or hooks are installed perfectly straight.
Step 3: Hang the Kimono Hold the kimono by its shoulders and carefully drape it over the center of the wooden rod. Adjust it so the center back seam of the kimono aligns with the midpoint of the rod. Ensure the shoulders are sitting flat and the fabric is distributed evenly on both sides. The collar should be arranged neatly, and the sleeves should hang freely, showcasing their full length and design. Step back and admire your work—a beautiful piece of art, displayed on a hanger you crafted yourself.
Creating your own kimono hanger is more than a simple DIY project; it is an act of preservation and appreciation. By taking the time to craft a support that is perfectly suited to the garment’s needs, you honor the artisans who created the kimono itself. This simple wooden rod, smoothed and finished by your own hands, becomes the worthy frame for a masterpiece, allowing its story and beauty to be shared while ensuring it remains protected for generations to come. This practice of mindful care is the final, essential step in the journey of owning and cherishing a kimono.


